Garments Manufacturing Process Flow Chart

Garments Manufacturing:

A complete garment has to face several processes from its order receiving to shipment. During garments manufacturing, a process flow chart must be needed to complete an order easily. Also a process flow chart helps to understand a garment manufacturing method that how the raw materials are converted into the wearable garments.
Garments Manufacturing Process

Flow Chart of Garments Manufacturing Process / Technology:

A basic garment manufacturing flow chart is presented in the below:
Design

Pattern Making

Fit Sample Making

Production Pattern Making

Grading

Marker Making

Fabric Spreading

Fabric Cutting

Cutting Parts Sorting or Bundling

Sewing

Garments Inspection

Garments Ironing and Finishing

Final Inspection

Garments Packing

Cartooning

Shipment
Each process of garments manufacturing flow chart is discussed in the below with the details:
1. Design:
Design is provided by the buyer. After placing an order buyer send the technical sheet and art-work of an order to the merchandiser. This process is done by both manually or by using computer.
2. Pattern Making:
By following technical sheet and art-work, pattern of each garment style should be made. It’s done by both manually and by using computerized method.
3. Fit Sample Making:
The main target of making a fit sample is to follow the details instruction about that garments style. After making it’s sent to the buyer to rectify. It’s done by manually.
4. Production Pattern Making:
For bulk production, allowance added here with net dimension. Production Pattern Making is done by both manually and by using computer.
5. Grading:
During an order confirmation, the buyer suggests about the size ratio of that order. So that order should be graded according to the buyer’s instruction. Grading is done by manually or by using computer.
6. Marker Making:
Marker is a very thin paper which contains all the parts of a particular garment. To make the cutting process easy, it’s must be needed. Marker making process can be done by both manually and by using computer.
7. Fabric Spreading:
To cut the fabric properly fabric is spread in lay form. Fabric Spreading is done by manually or by using computerized method.
8. Fabric Cutting:
Fabrics have to cut here according to marker of garments. Fabric Cutting process is done by using manual method or computerized method.
9. Cutting Parts Sorting or Bundling:
Here, cutting parts have to sort out or make bundling to send these easily into the next process. This process is done by manually.
10. Sewing:
All the parts of a garment are joined here to make a complete garment. Sewing process is done by manually.
11. Garments Inspection:
After completing sewing, inspection should be done here to make fault free garments. Garments Inspection is done by using manual method.
12. Garments Ironing and Finishing:
Here garments are treated by steam; also required finishing should be completed here. This process is done by using manual method.
13. Final Inspection:
Finally the complete garments are inspected here according to the buyer’s specification. Final Inspection is done by manual method.
14. Garments Packing:
Complete garments are packed here by using buyers instructed poly bag. Garments packing are done by using manual method.
15. Cartooning:
To minimize the damages of garments, all the garments have to cartooned by maintaining buyers instruction. This process is done by manually.
16. Shipment:
After completing all the required processes it’s finally send to the buyer.

To scan this code, you can use as QR scanner app on your phone or some camera apps.


Duties of a Sewing Machine Operator in Apparel Sector

The sewing operators accomplish the real job of apparel manufacturing. All the other people do the auxiliary works. Operators must know what they must perform and what level of performance; skill and workmanship are required from them. So, a job description in writing must be provided to the sewing machine operator. If sewing machine operator is illiterate each point of the job description must be described to him so that he takes the job seriously and can accomplish it as desired.

Sewing machine operator works in apparel industry

Job Descriptions for Apparel Production Sewer or  Sewing Machine Operator:

  1. Sewing machine operator will come to the floor in time & shall clean machine, workplace etc.
  2. He will check 7 ensure that his workstation is in right order.
  3. He will seek necessary instruction from here supervisor regarding his job.
  4. He will seek mock up sample from her supervisors so that he can understand the job.
  5. He will check the mock up sample so as to understand the sewing technique & the level of quality.
  6. He will check with the supervisor regarding his hourly & daily production target.
  7. If he does not understand any point regarding sewing or quality, he will seek elaboration from supervisor.
  8. Sewing machine operator will ensure measurements of apparel as per work order sheet or apparel specification sheet.
  9. He will ensure necessary seam allowances as per instruction.
  10. He will perform his job with utmost care so that no reject or defect occurs.
  11. He will handle apparel parts with care so that they do not spoil or stain.
  12. He will take care in handling bundles and parts in them so that they do not mix-up.
  13. He must see that he accomplishes his target.
  14. If there is any bottleneck, he will discuss with the supervisor & take countermeasures.
  15. He will check needle from time to time to ensure that it is not blunt or broken.
  16. He will take care that there is no under sewing thread tension.
  17. Sewing machine operator will ensure that stitch per inch (SPI) is correct.
  18. He will clean his sewing machine from time to time.
  19. He will take care of his machine.
  20. He will ensure that the designated machine cleans the machine, oils it, & takes care of it.
  21. He will continuously check if her work is compatible with the quality & quantity desired.
  22. He will discuss with the supervisor & senior operators about sewing problems or sewing defects and sewing techniques.
  23. He will ensure that his machine is equipped with eye guard or needle guard or puller cover.
  24. He will get trained on using firefighting equipment & how to face an accident.
  25. He will use mask all the time to offset micro dust.
  26. He will use hand gloves and scarf.
  27. Sewing machine operator will not panic at the time of hazard or fire disaster.

Garments Wash Care Symbols |

This guide explains what the washing and clothing care symbols on your garment labels say about how you should wash, dry, iron and bleach your clothes – taking you through all the essential steps of taking care of your wardrobe. The following wash care symbols cover how your garment should be cleaned:
Wash care symbol tips
Once you've washed your clothes, it's just as important to dry them properly. The following wash care symbols explain whether it is safe to use a tumble dryer after washing your garment, and if so, which setting is appropriate.
Wash care symbols for the dryer
If you prefer to dry your clothes naturally, the following clothing care symbols explain the best method to use without damaging your clothes:
Clothing care symbols
Once your clothes are dry, ironing becomes a priority: these wash care symbols explain how (and whether) your clothes should be ironed.
What wash care symbols mean
If your whites are looking a bit drab and grey, you should check for these wash care symbols before attempting to use bleach. It is also important to check the label of your product to ensure you use it properly and take the necessary safety precautions. 
(Use biocides safely. Always read the label and product information before use.)
Wash care symbols explained
Finally, some special garments are better off being taken care of by a professional; these wash care symbols cover whether your clothing should be dry cleaned
Clothes label symbols
If you have any clothing care tips of your own, we'd love to hear from you! Share them with us in the comment box below.

Over Dyeing & Tinting of Garments |

Tinting & Over Dyeing: 
After denim pant is being faded, the pants have dyed with very light color(.001% or .002%yellow or pink). This dyeing process is called Tinting/Over dyeing .This process is applied only on garments, not in fabric or yarn.


Tinting and over dyeing can be highlighted by the following way:
  1. This type of process is done after different types of washing before softening.
  2. Normally after Acid wash, Stone wash, Stone enzyme wash, Sand Blasting, Enzyme wash etc. tinting & over dyeing is done.
  3. Tinting & over dyeing is done with Direct dyes or Reactive dyes.
  4. Due to tinting and over dyeing, the white/base area colored with required dye yellow,Brown, Orange etc.
  5. As a result, new color effect is produced in the garments.
  6. If direct dye is used then color fixing treatment should be done at the end of dying process. In case over dyeing/Tinting with reactive dyes, color fastness is good hence no after treatment is required to fix the reactive dyes.
Tinting by Direct Dye: 

First Step: After different wet processing i.e. Acid wash, Stone wash, Enzyme wash, Stone enzyme wash, Bleach wash take 60 kg garment for Tinting & over dyeing. 
  1. Water at L : R = 1: 7.............. 420 Liter
  2. Run the Machine.
  3. Temperature................. 50 - 80°c
  4. Dir. Brown GTL - at 0.04%........... 24 Gms.
  5. Dir. Orange ZTL- at 0.01%........... 6 Gms.
  6. Add Salt at 20 gm / liter ............ 8.40 kg.
  7. Add Leveling agent at 0.5% /........ 210 gm.
  8. Time................................ 10 to 30 mts.
  9. Rinse by cold water 3 minutes.


Second Step:  Fixing 
  1. Batch size .............................. 60 kg.
  2. Water at L : R = 1: 7.............. 420 Liter
  3. Run the Machine.
  4. Temperature................. 50°c
  5. Add fixing agent at 0.8 %(owf) ... 480 gm.
  6. Time............................................ 10 mts. 
Third Step:  Softening. 
  1. Batch size.................... 60 kg.
  2. Water at L : R = 1 : 7 ............................ 420 Liter
  3. Add Acetic Acid at 0.6 gm/liter ............ 250 gm.
  4. Add Cationic softener at 1 gm/liter ...... 420 gm.
  5. Time................................ 10 mts.
  6. Drop the liquor.
  7. Then unload the garments on trolley. 
Fourth Step:  Hydro extractor machine. 
Hydroextractor machine is used to remove excess water from the garments. Fifth Step: - Dryer machine. After hydro extraction the garments are sent to drying m/c for complete drying. Sixth Step: - Quality & Delivery. After drying the garments go to quality checking & rectify washing fault and then good one delivery. 

Tinting by Reactive dye: 

First Step:  After different wet processing i.e. Acid wash, Stone wash, Enzyme wash, Stone enzyme wash, Bleach wash take 60 kg garment for Tinting & over dyeing. 
  1. Water at L : R = 1: 7.... 420 Liter
  2. Run the Machine.
  3. Temperature................. 60°c
  4. Reactive Red
  5. Reactive Yellow - Brown ......... 100 gm.
  6. Reactive Black -
  7. Leveling agent - at 0.5 gm / liter.......240 gm.
  8. Salt - at 20 gm / liter........... 8.40 kg.
  9. Soda ash at 10 gm / liter ............ 4.20 kg.
  10. Time................................ 20 to 30 mts.
  11. Drop the liquor.
Second Step:  Fixing. 
  1. Batch size.................... 60 kg.
  2. Water at L: R = 1 : 8 .............. 480 Liter
  3. Run the Machine.
  4. Temperature.................................. 50°c
  5. Add fixing agent at1 gm / liter..... 480 gm.
  6. Time............................................. 10 mts.
  7. Drop the liquor.
Third Step:  Softening. 
  1. Batch size.................... 60 kg.
  2. Water at L : R = 1: 7.............. 420 Liter
  3. Add Acetic Acid at 0.6 gm/liter ............ 250 gm.
  4. Add Cationic softener at 1 gm/liter ...... 420 gm.
  5. Time................................ 10 mts.
  6. Drop the liquor.  
  7. Then unload the garments on trolley
Fourth Step:  Hydro extractor machine. 
Hydro extractor machine is used to remove excess water from the garments. Fifth Step: - Dryer machine. After hydro extraction the garments are sent to drying m/c for complete drying. Sixth Step: - Quality & Delivery. After drying the garments go to quality checking & rectify washing fault and then good one delivery.

Carton Style & Dimenssion

Measuring boxes is as easy as 1-2-3. Box measurements always correspond to the inner dimensions of the box. This is done to ensure a snug and protective fit around your product.

diagram1 

/>


1. length
2. width
3. depth

Allow a minimum of 3mm extra to each dimension for the fitting . Be sure that the length and width do correspond to the opening of the box.

You can also provide us with a board size of the box. To do this fully open out the carton until it is just a single flat sheet and measure the length and width of the board. This board size is very useful when quoting for die cut boxes. If entering a quote enter flute direction as length and the other direction as width (As style 0110). Leave the depth blank.

Corrugated Carton

This probably is the most common style of box (0201) with fold over flaps to seal at the top and bottom. It is also one of the most economical styles of box in that it produces very little waste and requires no origination for manufacturing unless it is to be printed.

Die-Cuts

A very common style of box that is manufactured with the use of a shaped die-cutting tools. This style of box ensure higher degrees of accuaracy in size and consistancy and allows for almost any shape or style of box to be manufactured. When a special size or style is required a tooling charge will be incurred as a one-off charge.

Fittings and Internal Packaging

Internal fittings often form an important part of a packs overall design. The fittings can be simply seperator pads to complex multipart Die-cut divisions. They perform a key role in the seperation and cushioning of products and are fundamental to the overall performance of a packs design. Common types of fittings are pads, divisions and scored seperation and void filling fittings. The use and design of fittings is always driven by the product and distribution requirement.

Standard and Common Styles:

0100

0110

0200

0201

0202

0426

0427

0428

0429

0430 


Corrugated Board is made up of various liners and fluting:

Paper grades for the liner - outer and inner

(K) KRAFT - Virgin Kraft paper

(T2) TEST 2 - Partly recycled liner paper

(T) TEST 3 - Fully recycled liner

(C) CHIP - Waste based liners

(BW) FULLY BLEACHED WHITE - Fully bleached Kraft liner

(WT) WHITE TOP - White coated recycled liner

(MK MOTTLED KRAFT - Mottled white Kraft

(OY) OYSTER - Mottled test liner


Common Paper Weights

GSM=grammes per sq m

115/125 GSM

140/150 GSM

185/200 GSM

300 GSM


Common Flute Grades and Weights

Fluting is generally produced using waste based fluting medium (WBF), semi-chemical fluting (SC) medium is used for enhanced properties.

Flute Medium Weights

90 GSM WBF

105 GSM WBF - Most Common Flute Standard

112 SC and WBF

150 SC and WBF

175 SC and F

Wet strength adhesive can be used for certain applications


There are a number of common flute profiles or sizes

A FLUTE - 5mm - A - Good stacking and protection

B FLUTE - 3mm - B - Good puncture resistance + Most Common Grade

C FLUTE - 4mm - C - Good stacking and protection + Very Common Grade

E FLUTE - 1.5mm - E - Lightweight fine flute

F FLUTE - 1.2mm - F - Extra thin

BC FLUTE - Flute Double Wall 6mm - BC - Combination of B + C flutes

The various liners and fluting medium can be selected to produced A Board as a single wall board or double wall board.

Single Wall Board - 2 liners and single flute

Double Wall Board - 3 liners and double flutes

Triple Wall Board - 4 liners and three flutes


Common Board Grades

When choosing a board grade this may be a guide to common grades

Paper Combination:
125K/125T - B Flute - Light Standard Grade

150K/150T - B Flute - Common/Medium Grade/Postal Grade

200K/200T - B Flute - Heavier/Durable Board

300K/300T - B Flute - Very Heavy/Strong Board

To increase the cushioning or the stacking strength of the box change the 'B flute' for a 'C Flute'. For example 125K/125T - C Flute.

If you really want to beef up the packaging specification then change the single flute either 'B' or 'C' for a much stronger double wall (double fluted) board.

Example:
200K/200T/B Flute = is equal to 125K/125T Double Wall


The liners can also have special coatings, finishes or properties

Polythene

Anti Static

Conductive

Colour Wash

Water Resistant

Fire Resistant

Anti Abrasive

Acid Free

Clay Coated

Soft Tissue

Post Consumer/Recycled

Exposed Flute

Pre Print

Sesame Tape

Rippa Tape

Foam Lined

Carton Price Calculation

For Example, Carton Measurement As Below:


Poly Bag Sizes Explanation


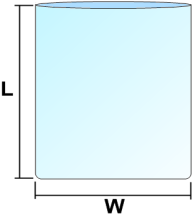
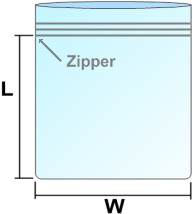
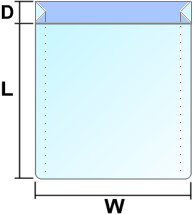
In the standard format for describing a poly bag:

  • the width of the bag is always taken to be the side that opens, so this is normally, but not necessarily, the shorter side.
  • the width of the bag is given before the length.
  • the thickness of the bag is given last and is usually expressed in 'gauge' (100 gauge = 1/1000 of an inch).
  • hence the size of a bag is given as: Width (inches) x Length (inches) x Thickness (Gauge).
Flat BagsFlat Bags
Zip lock BagsZiplock Bags
For example: if a bag is said to be 4" x 6" x 150 gauge then the bag is 4" wide by 6" long with 150 gauge thickness and the bag will open on the 4" width.

How thick is thick?

100 gauge - a 1/1000 of an inch.
120 gauge - 'light duty' - good for protective covering.
250 gauge - 'medium duty' - good for holding light materials.
500 gauge - 'heavy duty' - where strength is required.

Metric and Imperial - a complication!

Most measurements are given in imperial (inches and gauge) but some of us prefer to use metric scales and the conversions are as follows:
1" = 25.4 mm
400 gauge = 100 micron
For example: a 4"x 6" x 150 gauge bag is the same as a 102mm x 152mm x 37.5 micron bag.

Gussets - a complication!

Some bags have a gusset at the sides to help the bag open out more and enable a greater volume of items to be put in - a good example is a refuse sack. Others have a gusset at the bottom to enable a wide product to fit in - a good example is a carrier bag.
Gussted BagsGusseted Bags
  • A side gusset is expressed as a bag being x" wide opening to y" wide. For example: if a refuse sack is 16 x 25" x 39" this means it is 16" wide opening to 25" wide when the gusset is opened, with a bag length of 39"
  • A bottom gusset is expressed as + x". For example: if a carrier bag is 15" x 18" + 3" then the carrier is 15" wide by 18" long with a bottom gusset of 3".
D - Total depth
L - Length
W - Width
We very much hope this helps but if you require any help or have any questions please call 0845 200 2828 and talk to one of our experts!

How to Increase Higher Productivity | Concepts of Production and Productivity in Garment Industry | Productivity in Apparel Manufacturing | Productivity Improvement in Apparel Industry


Productivity in Clothing or Apparel Sector:

Productivity is a frequently talked about phrase in any production oriented enterprise. It is totally related with the profit percentage of an apparel export order in apparel industry. Destiny of an organization eventually depends upon quality and productivity. Many people conceive of productivity as an entity separate from quality. Productivity actually always encompasses quality. There is actually no meaning of high productivity if the products or services produced are of second quality.

Sewing line in readymade apparel industry
It is also unwise rather harmful to view productivity as activities related to production department alone. Productivity relates to all activities in the enterprise. This chapter shows how low productivity brings in a chain of vicious cycle in the organization, the measures to be taken to boost productivity in totality and how systems and processes promote productivity.

Production Versus Productivity:

Production generally refers to activities that convert resources into product or services while productivity is related with how specially products or services are produced.

20 Factors to Improve Productivity in Apparel Sector:


The following measures should be adopted through the enterprise so as to improve productivity in the readymade apparel-industry:
  1. All materials available in time,
  2. Using time and motion study,
  3. Right and scientific machine lay-out,
  4. Right and scientific target setting,
  5. Right type of technology used,
  6. Right level of worker attendance,
  7. Motivated workforce,
  8. Computerization of all possible works of all the departments,
  9. Right material handling processes,
  10. Skill and workmanship of workers,
  11. Job satisfaction at workplace,
  12. Good work environment,
  13. Using right systems,
  14. Right leadership quality of supervisors, APms, PMs, etc,
  15. Right organization of materials,
  16. Right quantity of high performance machinery,
  17. Proper machine maintenance,
  18. Continues training,
  19. Minimum worker migration,
  20. Using right processes.

Definition of Pattern | Classification of Pattern | Basic Block or Block Pattern | Working Pattern

What is Pattern in Apparel Industry?

Pattern is a hard paper which is made by following each individual component for a style of apparel or clothing. Pattern is one of the most important parts of apparel industry. In the past I have presented two important articles related with pattern which will be very useful for you.
Pattern used in apparel industry

Types of Pattern Used in Clothing Sector:

There are mainly two types of patterns used in readymade apparel sector which mentioned in the below:
  1. Basic block or block pattern,
  2. Working pattern or apparel pattern.
All the above two patterns have discussed in the following:

1. Basic block or block pattern:

Basic block or block pattern is an individual component of apparel without any design or style. It can be made into two ways such as modeling and flat method.
a. Modeling:
Modeling is a primary and first method. Still it is widely used in apparel industry. In modeling method, block is made with standard body measurement of dummy which is known as toile. Toile is worn on the body of dummy to check fittings. After that, toile is worn out from the body of dummy and individual parts of toile are drawn on board paper or hard paper. This method is most efficient but needs more time.
b. Flat method:
In case of flat method, the pattern of different parts of apparel especially body and sleeve are made by technicadrawing. Actually, this method comes from modeling method and by this method fast pattern making is possible.

2. Working pattern or apparel pattern:

Apparel pattern is made on the basis of basic block or block pattern. Individual block pattern are drawn on board paper or hard paper. Different types of allowances i.e. trimmings allowance, sewing allowance, bottom line, center front line, pleat, drat is considered in this type of pattern.